
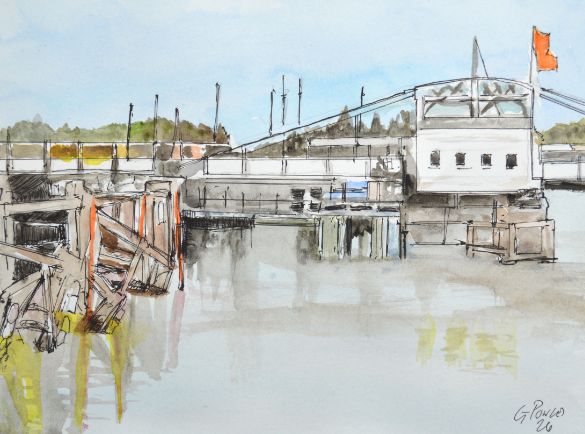
Broadview Wine Bar, Oulton Broad There is a quiet geometric rhythm to the buildings along…
How to Frame and Hang Paintings
A frame does far more than simply define the boundaries of a piece of art; it can completely transform a painting, providing a polished, finished look that draws the viewer in. The marriage between a painting and its frame must be harmonious. A poorly chosen frame can distract from and diminish the artwork, while an appropriate selection can make the colours and textures truly glow.
When choosing a presentation style, your options span a massive range of designs, colours, styles, and materials—from budget-friendly moulded polymers to high-end, hand-carved hardwoods. Ultimately, the perfect frame depends on your personal taste, the artwork’s style, the room’s decor, and where the piece will live.
The Modern Alternative: Unframed and Box Canvases
For modern and contemporary art, you may choose to skip the traditional frame entirely. If an artwork is painted on a deep gallery-wrapped canvas or a sturdy box frame with finished edges, it can be wired and hung exactly as it is. This minimalist approach allows the viewer to focus entirely on the raw energy of the artwork itself, creating a clean, seamless look against the wall.
A Step-by-Step Guide to Framing and Hanging
If you prefer a traditional display, proper framing and secure installation will beautifully showcase your artwork while protecting it from wear and tear. Follow this comprehensive guide to get professional gallery results at home:
Phase 1: Preparing and Assembling the Frame
-
Measure the Artwork: Accurately measure the height and width of your painting using a tape measure before purchasing materials.
-
Gather Your Tools: Assemble your frame, mounting hardware (framing points, spring clips, or brackets), a hammer or screwdriver, a pencil, a spirit level, and appropriate hanging wire or heavy-duty wall hooks.
-
Prepare the Canvas: Ensure the painting is completely dry and free of dust. If it is an oil or acrylic piece, ensure it has been properly varnished for protection before it is sealed into a frame.
-
Fit the Painting: Place the frame face down on a soft, clean towel or blanket to protect the finish. Position the painting face down inside the frame, ensuring it sits flush and centered. Secure it in place from behind using metal brackets, spring clips, or flexible framing points.
Phase 2: Installing the Hardware
-
Attach the Hanging Wire: Secure heavy-duty D-rings or screw eyes to the left and right vertical sides of the frame, roughly one-third of the way down from the top. Thread a sturdy hanging wire through the rings, leaving a slight slack, and secure the ends tightly.
-
Test the Balance: Lift the frame by the wire to ensure it sits flat and balanced without leaning awkwardly forward or tilting to one side.
Phase 3: Perfect Placement on the Wall
-
Find the Perfect Height: Hold the framed piece against the wall. A good gallery standard is hanging art so the centre of the image sits at eye level (roughly 57 to 60 inches from the floor). Use a pencil to lightly mark the top centre of the frame on the wall.
-
Account for the Wire Slack: Measure the distance from the top of the frame to the taut apex of the hanging wire, and measure down that exact distance from your wall mark. This is where your wall hook needs to be installed.
-
Anchor the Wall Hardware: Install your wall hooks, heavy-duty anchors, or screws at the adjusted mark. Always use a spirit level to ensure your hardware aligns perfectly.
-
Hang and Level: Carefully lower the wire onto the wall hook. Step back a few paces to evaluate the placement. Use your level on the top edge of the frame to make micro-adjustments until the bubble rests perfectly in the centre.
Phase 4: The Finishing Touches
-
Protect Your Walls: Consider sticking small felt pads or rubber bumpers onto the back bottom corners of the frame. This simple trick prevents the frame from scuffing your paintwork and helps the piece sit perfectly parallel to the wall.
-
Final Polish: If the frame includes glass or plexiglass (common for watercolours, pastels, and prints), clean the surface gently with a microfiber cloth and a specialised glass cleaner to remove any fingerprints or smudges.
By taking your time and handling your artwork with care, you can create a beautiful, secure presentation that preserves your paintings and elevates your entire living space.

Related Posts



Comments (0)